If you’re a media buyer looking for traffic opportunities I’m sure you’ve heard of Adcash before. If not, you’ve been missing from one of the big networks in terms of volume for PPV, interstitial, native, and push notification networks out there.
I started working with Adcash back in 2015 and nowadays they have improved a lot in terms of their SSP and platform to manage your campaigns. Back then all of my campaigns were managed by my assigned account manager and only Pop under traffic was available.
With more than 200 million impressions per day, you can pretty much reach anybody in the globe and run your affiliate campaigns at volume.
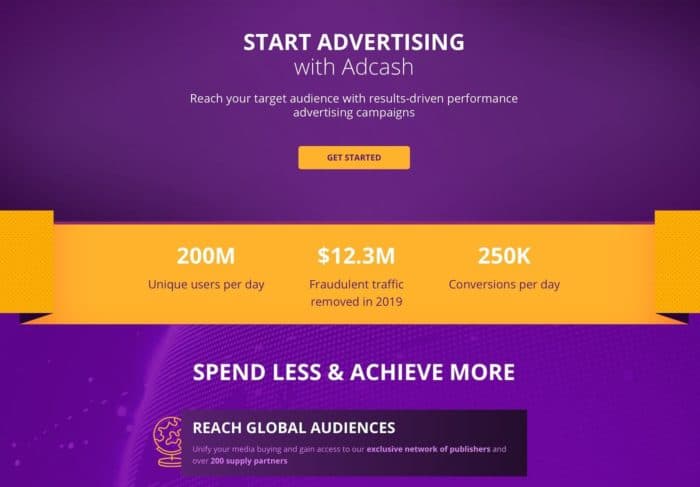
What I like about Adcash is the way you can create and fine-tune your campaigns with different targeting options and filters. Also, you can run campaigns on CPC, CPM, and CPA bids, which allows us to test different ways to buy traffic and profit from it.
Adcash Review – Signing up
Getting an account with Adcash is easy. Just go to this page and sign up as an advertiser. Alternatively, you can also sign up as a publisher if you have websites with traffic to monetize but we’ll focus on the advertiser side this time.
Once your account is validated and approved you will be able to sign in to your dashboard which looks like this:
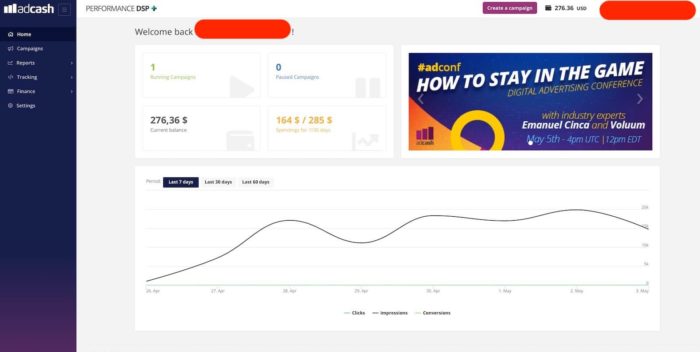
There, you can see your daily stats, the balance you have available in your account, add funds, and create new campaigns easily.
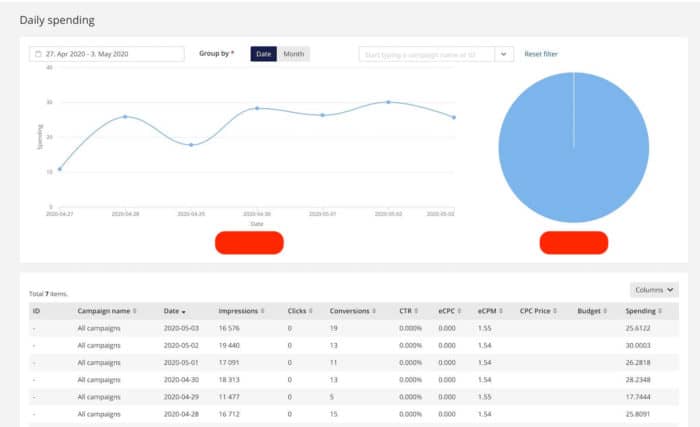
This is how the stats are shown along with your conversions (if you set up a postback URL), CPMs, ad spend, impressions, etc.
As for adding funds, Adcash has 5 different methods including:
- VISA/Mastercard CC
- Bank transfer
- PayPal
- WebMoney
- Skrill

I personally prefer to fund my account with CC or PayPal if for some reason the CC can’t be charged at that moment. The minimum deposit at the moment is USD 100.
GET AN EXTRA $/€225 BONUS ON YOUR FIRST DEPOSIT*:
Create an Adcash account and make a deposit to receive your bonus.
Only new accounts are eligible for this offer.
- Get a $/€50 bonus on your $/€200 deposit
- Get a $/€100 bonus on your $/€500 deposit
- Get a $/€225 bonus on your $/€1000 deposit
Send an email to bonus@adcash.com with “SERVANDOSILVA 2020 Bonus” in the subject line and share your account ID with Adcash.
🚀 Enjoy the bonus and skyrocket your results with Adcash.
Adcash – Creating your first campaign
Once you have added some funds it’s time to start a new campaign to get data and optimize for profits. If you start creating a new campaign you’ll be asked if you want to create a new “Express campaign” or an “Advanced campaign“.
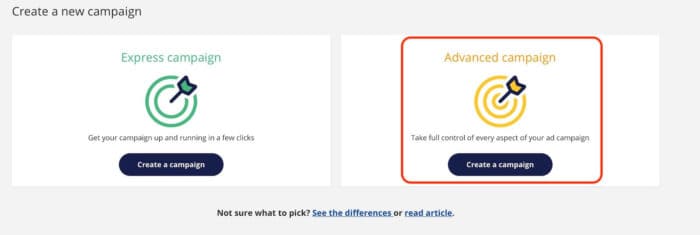
I always create campaigns with advanced options as you get more filters and options to analyze and optimize data later. Let’s go over how to create your first campaign.
First, you’ll have to fill all the “general information“. This includes the name of your campaign and the country you’re going to buy traffic from:
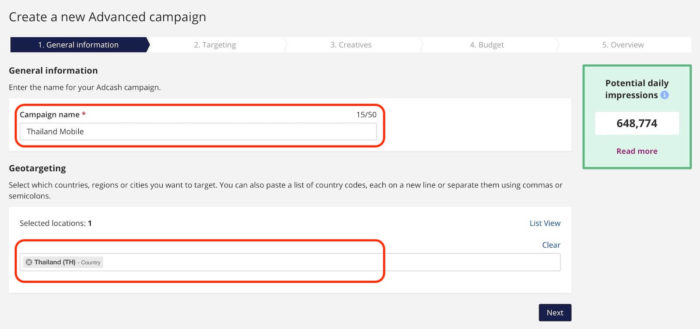
I always recommend people to buy traffic from 1 country per campaign to separate the bids and be able to optimize your campaigns without mixing data. Let’s create a campaign for Thailand in this example.
The next step is “Targeting“. Here’s where I do most of my optimization once the campaign starts running. First, you’ll need to select the traffic Supply and ad format.
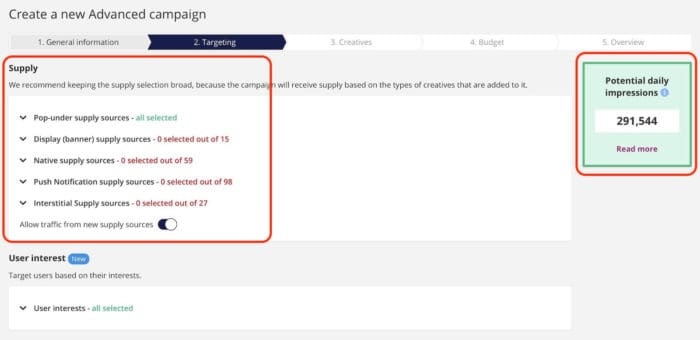
As you can see, you can choose from several ad formats including:
- Pop-Under
- Banner display
- Native
- Push Notification
- Interstitial
Again, I only recommend choosing 1 type of traffic at the same time as every ad format is different and has different bids and optimization parameters. I’ll be creating a pop-under campaign in this example.
Also, notice how the green box in the right corner updates to show the potential daily impressions available with your targeting.
If you click any of the ad formats you will also see a list of supply networks where you can buy traffic from. Adcash is the network sending you more volume most of the time, but you can buy a ton of traffic from other networks as well through Adcash DSP and Adcash is quite transparent about this. You’ll see why later in the article.
Now you’ll have to select the filters for your campaign, including:
- Devices
- OS
- OS version
- Browser
- Browser version
- Browser Language
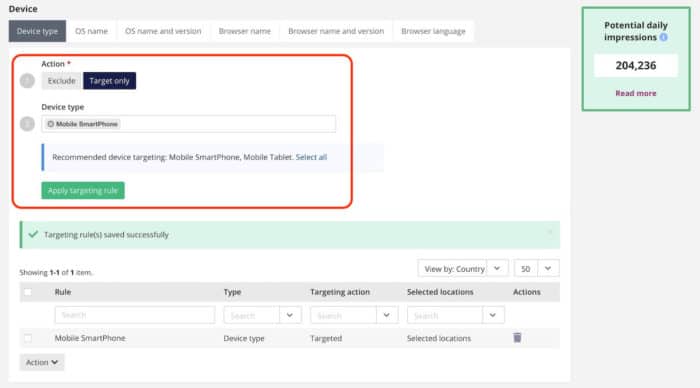
Initially, I normally leave all of them targeted unless the campaign has some specific requirements. The one thing I make sure to select though is the device type, as I always separate my mobile campaigns from desktop or tablets.
However, this depends a lot on the offer you’re going to promote. You’re not going to pay for iOS traffic if you’re running an Android app for sure…
Next is content. Here, you can optimize your campaigns by:
- Domain
- URL Keywords
- Categories
- Zones
- Traffic restrictions
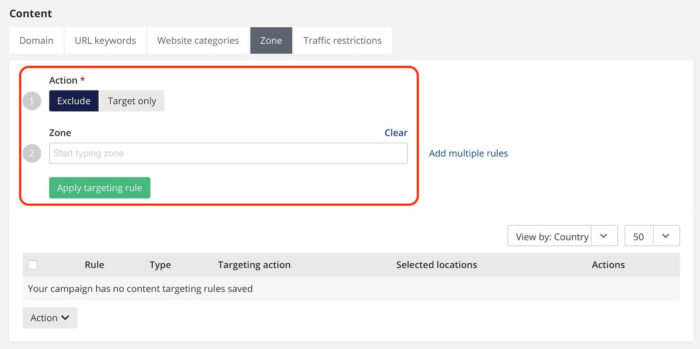
In this case, I leave everything for now and later I come back and optimize by zones, blocking all of the websites that aren’t performing well for my campaign since I normally run RON (Run of network) campaigns and have to blacklist sites to optimize my results.
As you can see, this is the tab where you’ll be doing your optimization at a later stage. Once you’ve finished filling your filtering settings click next and you’ll find the “Creatives” tab.
Here, you just need to select your creative type according to the desired ad format and input the campaign URLs from your tracker:
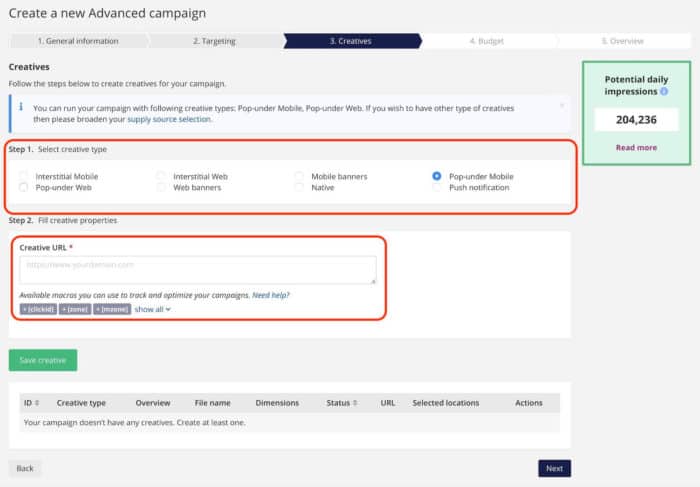
The campaign URL from your tracker should include the dynamic tokens to track your results and optimize your campaign. According to the type of ads you’re using, the tokens could be a bit different so make sure you’re using the correct tokens.
Here’s how I setup my tokens for Adcash popunder with Voluum tracker:
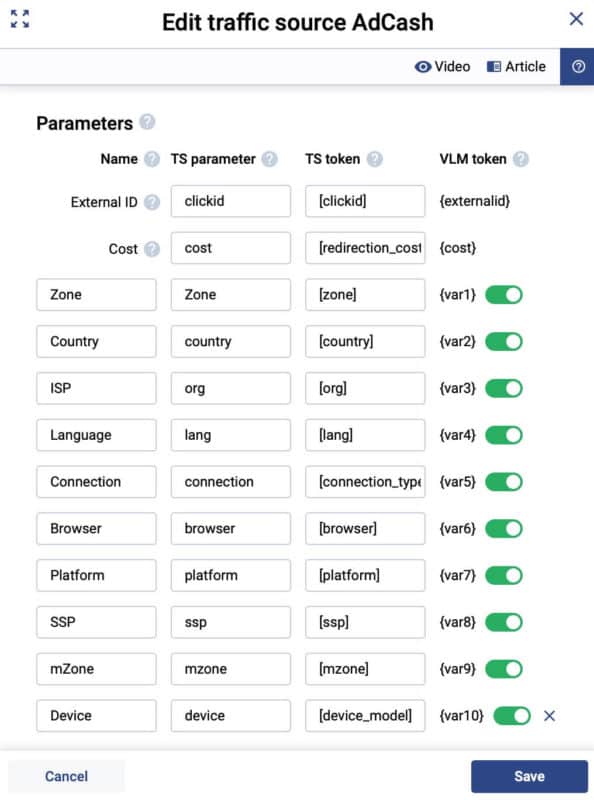
Once you’ve done that, click next and move to the next tab which is “budget“.
Here, you’ll define the budgets for your campaign. You can choose to daypart your campaign first and then assign a total budget for it, which I normally leave as “unlimited“. Later you can choose a daily budget below, which is what I use to limit my campaign impressions to the amount of money I want to spend per day.
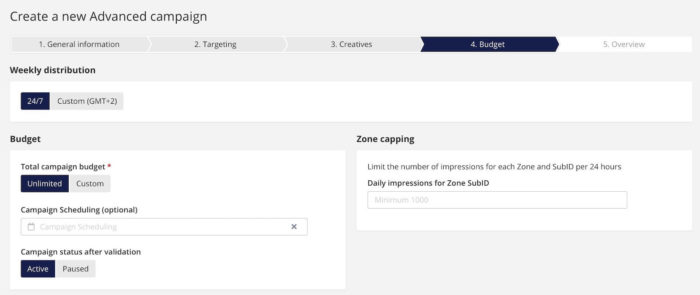
Later you’ll have to select the bid type (CPC, CPM, or CPA target) and a frequency cap, which I normally recommend to set at 1/24 hours initially.
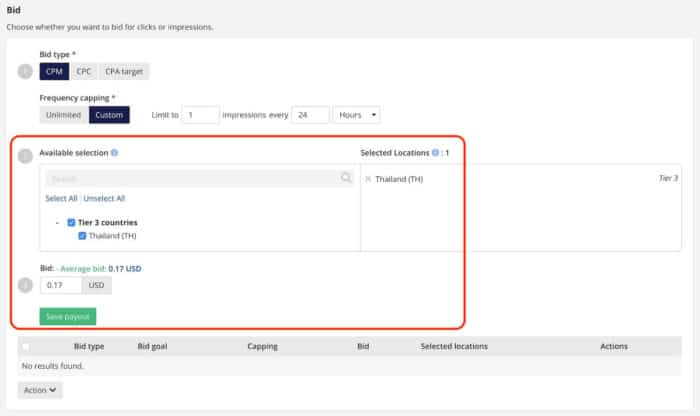
After that, select the country you’re targeting and choose the bid you’re willing to pay for your traffic. An average recommended bid will appear according to your settings.
If you’re choosing a CPA target campaign you will also need to create a postback and add it to the tracking menu later.
That’s it. Once you’ve done this, click next and you’ll find the last tab, which is the “summary”. Double-check everything to see if your settings are right and click next to send the campaign to moderation.
Adcash Review – Optimizing a campaign
Adcash is still one of the networks with great volume to work with. For example, we launched a mobile content campaign recently and if you have experience with those you know getting carrier traffic from pop-unders in medium-small geos can be difficult as many networks can only deliver a few hundred impressions per day. Yet, we were able to start a campaign, optimize it, and then increase our volumes after a week with Adcash once profitable.
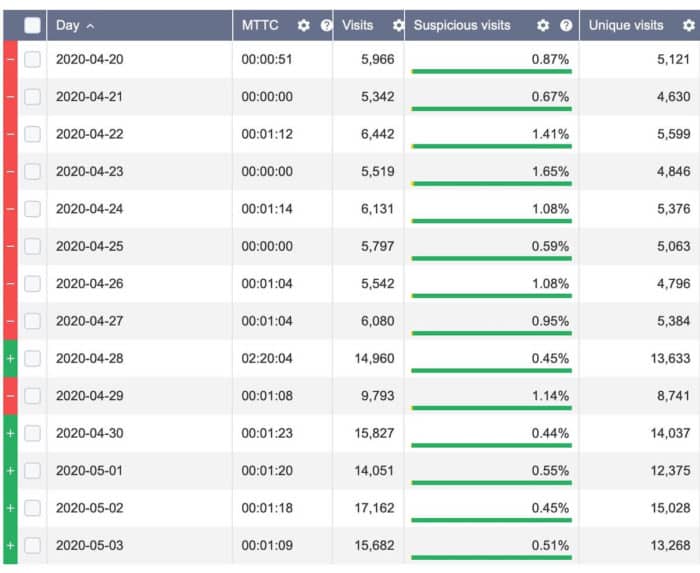
To optimize your campaign I always recommend analyzing all the factors, starting with the websites sending you traffic and then moving to bigger filters like OS, browser, landers, offers, etc.
Here is how websites (known as zones) in Adcash are displayed in your tracker:
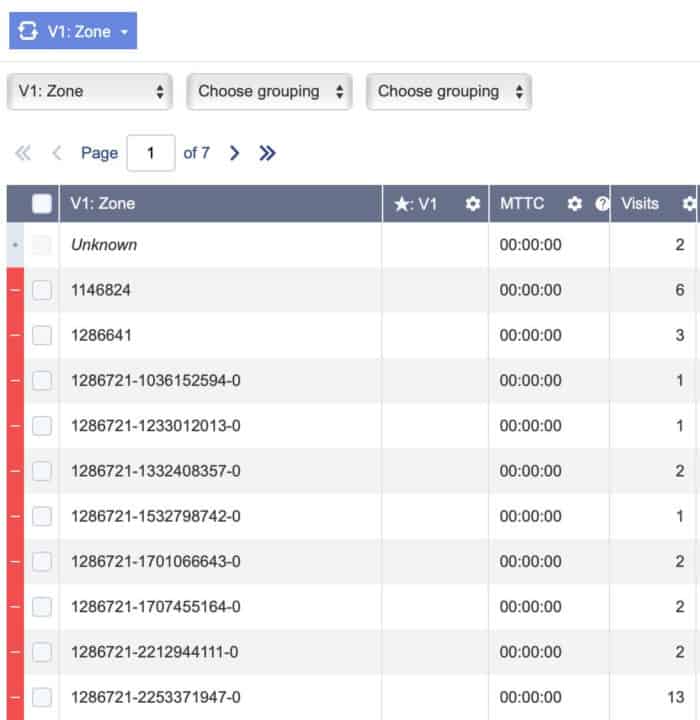
As you can see, some websites have multiple strings of numbers and some others don’t. The first number acts as a master zone, which includes a group of zones in case you want to block them all at once just by blocking the master zone completely.
This is not something new and there are many networks, especially with push traffic, that allow you to block a group of websites linked by an advertiser or multiple placements.
Also, remember when I told you Adcash allowed you to buy traffic from many traffic sources and was open about it?
Here’s how the stats look when looking at your SSP data:
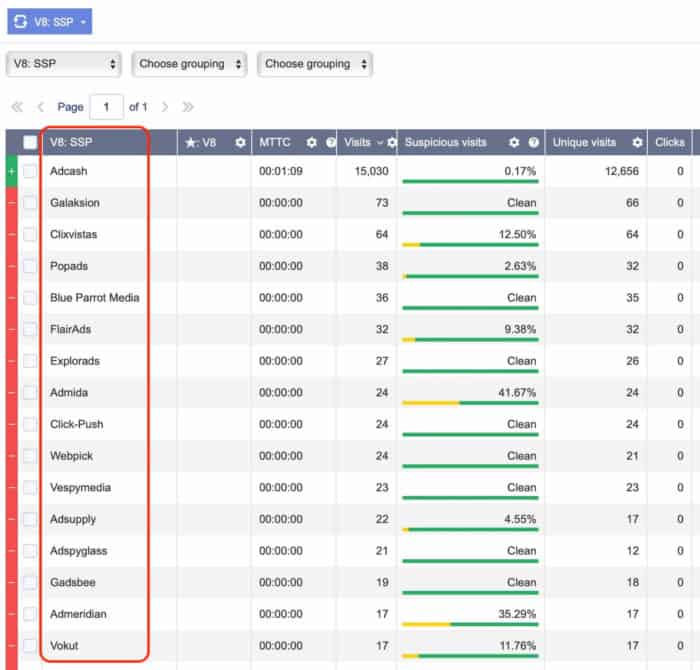
Yeah, completely transparent.
So you know if your campaign works in other sources and they’re not hidden behind a string of characters as other SSPs do. I have managed to find some really interesting pockets of converting traffic when testing campaigns at Adcash that later can be optimized by traffic source in a separate campaign.
Overall, I like how Adcash has improved its system and added tokens and filters to optimize campaigns lately. Their managers have always been very helpful to me and sometimes they even help me set up campaigns or optimize the bids to get as much traffic as possible.
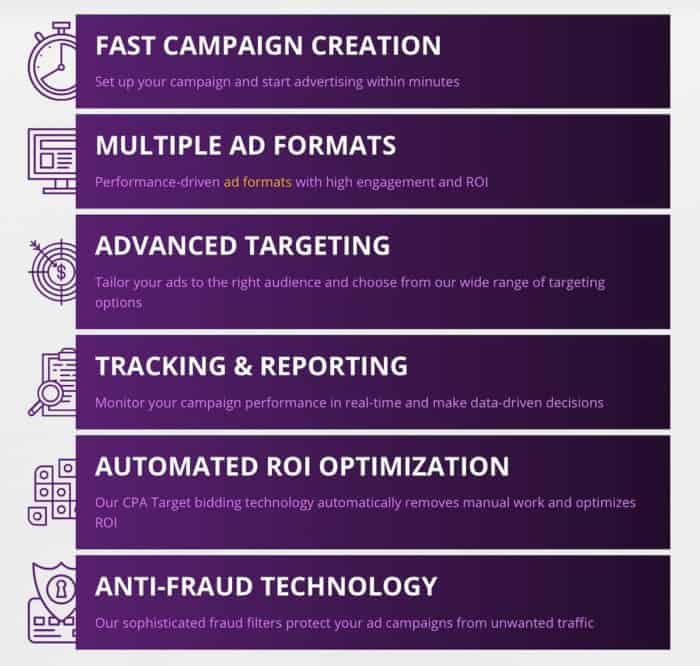
Take that and add huge volumes and 5 different types of ads and you’ve got a traffic source with the potential to spend a ton of money and profit from it.
If you want to try Adcash sign up here and launch your first campaign!
GET AN EXTRA $/€225 BONUS ON YOUR FIRST DEPOSIT*:
Create an Adcash account and make a deposit to receive your bonus.
Only new accounts are eligible for this offer.
- Get a $/€50 bonus on your $/€200 deposit
- Get a $/€100 bonus on your $/€500 deposit
- Get a $/€225 bonus on your $/€1000 deposit
Send an email to bonus@adcash.com with “SERVANDOSILVA 2020 Bonus” in the subject line and share your account ID with Adcash.
🚀 Enjoy the bonus and skyrocket your results with Adcash.
Hola Servando. Espero que estés bien.
Me gustaría saber que recomiendas mas en este momento con un presupuesto de $2,000 usd, Trafico Pop, Redirect o Push Notification o cual otra me recomiendas para correr ofertas CPA. También quisiera que me dijeras algunas Fuentes de trafico que recomiendes para iniciar una campaña desde cero.
Muchas gracias por tu tiempo.