Welcome to this “quick” guide to setup step by step your tracker for the first time if you’re a complete newbie. This isn’t your typical review where people just go over the main features of a product and place an affiliate link at the end of a 200 words post. In fact, there are 4,000 words in this guide and you can bet it took me a while to write down.
Today we’re going to talk about trackers. When you start doing media buying and running CPA campaigns the tracker is one of the fundamental tools you need in your repertory.
Besides having accounts in a traffic network and another with an affiliate network, you need a tracker, a server or a place to host your landing pages and money to get started.
All the rest can be obtained later but the tracker is essential and every new person who comes into this market and tries launching a campaign without a tracker (except for Facebook or Adwords, maybe) fails miserably because they had no data to optimize and had no idea what was happening with their campaigns.
Wide range of trackers available
I still remember when the most common options for affiliates were CPVLab and Prosper, but eventually, a few years later we had the STM tracker, iMobitrax and then Voluum.
But nowadays we have a full plethora of options and I think you really can’t go wrong with any of them. There’s Adsbridge, Voluum, Thrive, FunnelFlux, Clickbakers, etc.
All of them have their own UIs and features, and I think most of them do their job without problems. If you’re getting started and you’re not a tech-savvy person you might be better with a cloud-hosted solution like Adsbridge or Voluum, but if you still want to host your own tracker you can do that with Thrive and FunnelFlux (although they’re all slowly moving to cloud solutions as well).
Besides that, it’s a matter of personal choice, pricing and also a matter of moving all of your data to a new solution which is always a pain in the…
Anyways, for the new people in this business, I’m sure one of the best solutions, if not the best to start learning is Adsbridge.
Why? They have a free trial and are cloud-hosted.
When you’re new you already have to learn all the ins and outs of getting traffic, setting campaigns, using photoshop, basic HTML, CPM, bids, click loss, etc. and the less you need is to handle server optimization unless you’re good at it.
Also, when you have a tight budget (e.g. $1,000 per month to start learning) and you’re not moving much volume in your first tests a free trial or a basic plan is always welcomed to maximize your efforts while learning the ropes.
Here comes Adsbridge to the rescue
When I first heard of Adsbridge (mid of 2015) I was very skeptical. Affiliates tend to be very skeptical about any tool that handles their data because that’s where the money is. You don’t want to deposit your trust in a small company that only wants to steal your data after a few months and run away with your campaigns.
But of course, running a tracking SaaS requires much more than that, as Robert explained in Attila’s Interview and as it’s been explained tons of times in the STM forums.
However in 2016, I made a decision to test at least 3 trackers besides Voluum just to be open-minded and so I tested FunnelFlux, Thrive and Adsbridge.
Adsbridge has been present in the Affiliate conferences lately and they approached me and explained their features and what they think they have as advantages and benefits over the competition. All the Adsbridge team (Alex, Elen, Zach) has been very nice and I trust their service now.
Adsbridge pricing
As you can see Adsbridge has 6 different plans depending on your traffic needs. Their paid plans go from $29 per month to $699 and more if you want to get a custom plan.
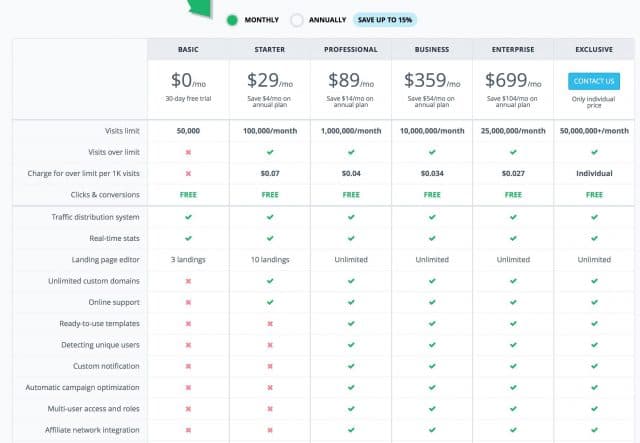
Their basic plans lack a lot of the extra features that make Adsbridge an interesting option for people who are already running campaigns profitable, but they’re great for starters who just want to learn the basics of tracking and see if they can launch their first campaign and check if the links and postbacks are being sent correctly. We’ll have a look at those extra features ($89 per month and above) at the end of this guide.
However, let’s concentrate on the prices because Adsbridge is a bit less expensive than other solutions. While many trackers have 3 tiers of prices ranging from $99 per month (basic) and up to $999 or more per month (advanced), Adsbridge offers lower prices.
Voluum (great cloud-hosted tracker) has a $ 99, $399 and a $999 plan based on similar amounts of traffic as Adsbridge.
However, Adsbridge costs $89, $359 and $839 (if we count 30 million visits instead of 25 million).
Additionally, they have a 30-day free trial and a basic plan to get started at $29 per month.

All this makes sense when you’re getting started and you want to keep most of your money to run campaigns while just spending a dozen bucks on a VPS/CDN and a tracker. It also allows you to learn the ropes for less than $30 for the first 2 months, while you’d have to pay at least $198 with other solutions. That’s why overall I think Adsbridge is a great solution for the budget beginner as well as for advanced affiliates.
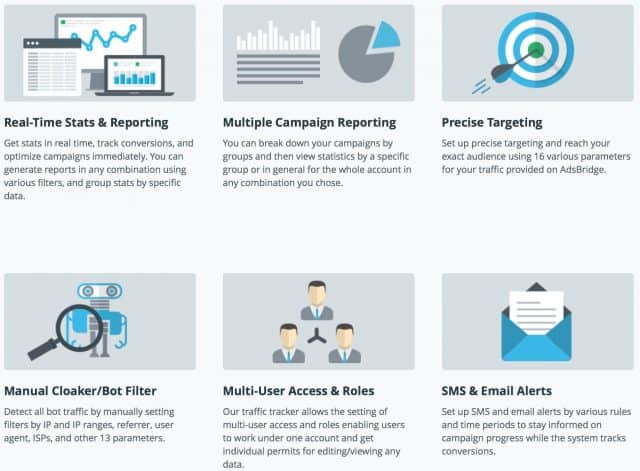
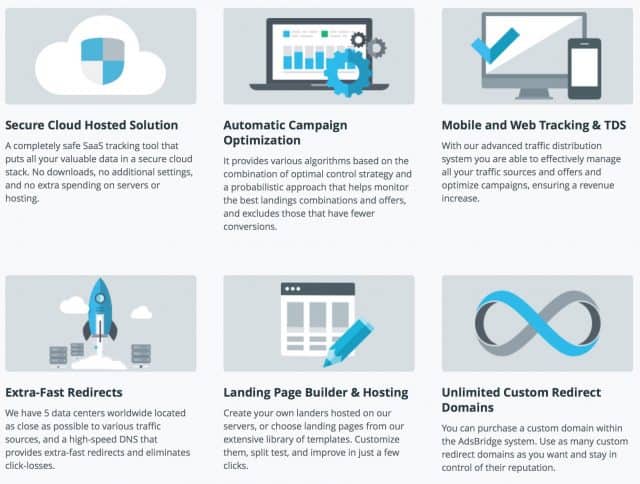
You can check their features here, but we’ll check in detail the interesting stuff later.
Let’s get started and set up a campaign as if I was completely new in the industry and this was my first time logging into my Adsbridge account.
Just keep in mind I opened a new account for this tutorial and the postbacks and URLs you see here are just examples. Don’t try to spy my campaigns in real life with these links LOL. Also, this is an $89 professional account, so you might see a few fewer options from the extra features if you’re in the basic or free plan.
The campaign setup remains the same though, which is why you’re reading this guide. I’m going to assume you have no idea how to setup subids or postbacks from the network and explain it everybody can follow it. When I was new I had no idea how to set up a tracker and I had to ask a lot of questions and read many tutorials at the same time to try to understand what I was doing wrong.
When I finally got it I wrote a guide in the AffiliateFix forum that has helped a ton of people so I just wanted to do the same with Adsbridge. We all know tracking is difficult at the beginning and it becomes easy as time goes by. Feel free to ask questions if you need them in the comments too.
Adsbridge basic setup
OK, so first you need to create an Adsbridge account. Here’s the sign-up page.
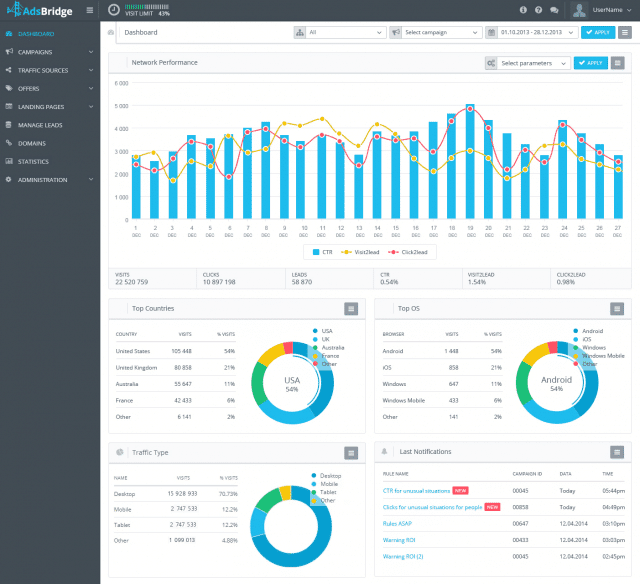
After creating and validating your account by email you’ll be able to log in and see this panel.
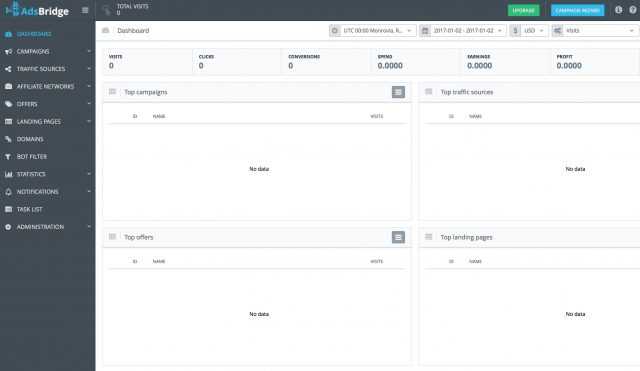
On the left side, you have the menu, which allows you to setup offers, networks, traffic sources and landing pages (that’s all you need to run a campaign). Also, you’ll see some extra options like domains, stats and the extra features for the $89 plan and above like bot filtering and notifications.
The first thing you need to do is to set up a domain. If you’re using the free trial you can skip this part and use Adsbridge’s domain but eventually, you’ll want to have your own domain set up to have control of your offers.
If you have a domain already (e.g. trackingsystem.com) or you want to buy one (I recommend Namecheap because of the low prices and free Whois privacy 1st year) you can add it in the Domains menu just like this:
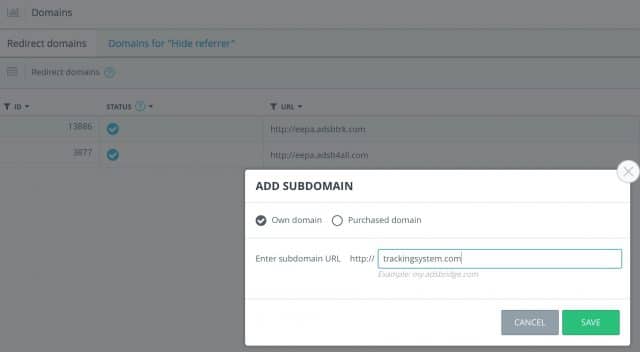
After that, you’ll have to CNAME your domain to one of Adsbridge’s URLs to make it work. The process is very simple and there are a lot of guides from Namecheap, Godaddy, etc. to set up CNAME which will take you 5 minutes or less so I won’t cover that.
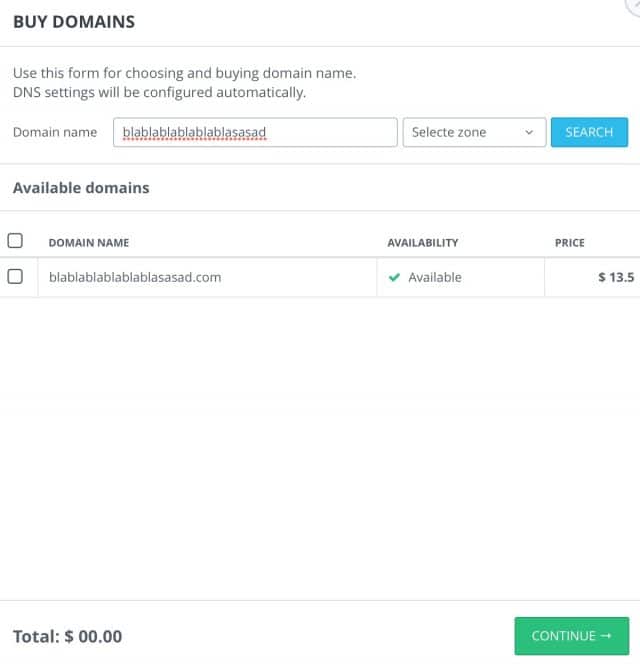
If the CNAME and domain setups are already scaring you Adsbridge also gives you an option to buy a domain through their own system. Click the “buy domain” button in the domains menu and just like the picture below you can write a domain to see if it’s available. They’ll charge $13.5 and you won’t have to set up anything or do the CNAME if you buy it through Adsbridge.
Setting up your first campaign
After setting up your first domain let’s go back to the dashboard and click the “campaign wizard” blue button at the top right corner. A message like this will appear in your screen:
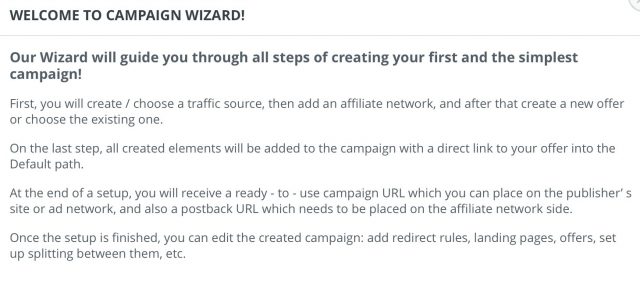
We’re going to launch first a directly linked campaign to see how the process works, and later we can edit it and add landing pages and other rules. Click next and you’ll be asked to create a traffic source.
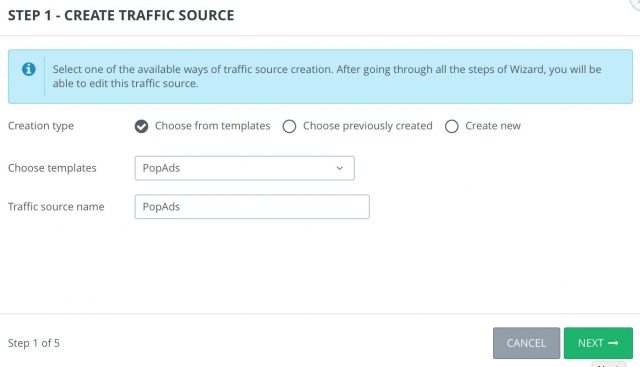
If you have the professional version you’ll have a lot of traffic sources already added for you within the tracker, and also some affiliate networks. If you’re using the free trial you’ll need to create a new traffic source and add the tokens but thankfully Adsbridge has done this for us already with the paid plans. Let’s select PopAds as an example as it’s one of the favorite sources for beginners.
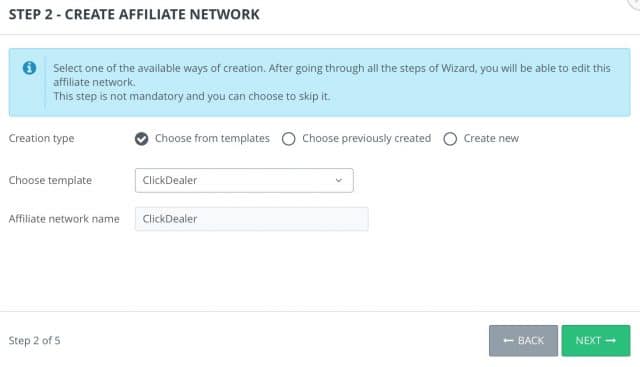
Click next and you’ll be asked to create an affiliate network. This step is easier because even if you’re using the free trial creating an affiliate network is just a matter of writing the name and save it. I’m choosing Clickdealer as an example but it doesn’t matter what you’re using here yet. Just as a note, Clickdealer uses Cake as its platform. Some other networks use Hasoffers and other networks have their own tracking solutions, but most of them work similarly. They all have subids and postbacks.
Let’s click Next and the wizard now will ask you to create an offer. Here you will copy and paste your offer link from the network (Clickdealer in this case) like in the screenshot below.
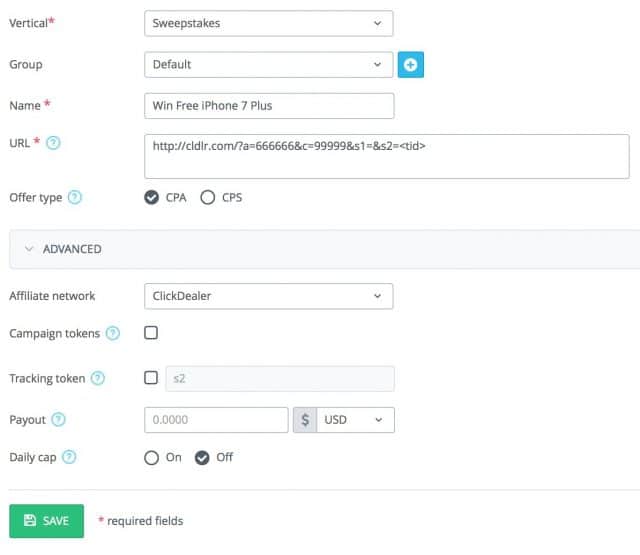
You’ll also have to choose a vertical, a name (you can put whatever works best for you) but the rest is optional. You can add the payout of the offer but I prefer leaving that blank because the network will pass that value with the postback and in case your offer’s payout gets increased/decreased it will automatically reflect in your data instead of having to change it manually.
The most important step here is to check your offer URL, which will be something like this:
http://cldoffers.com/?a=66666&c=999999&s1=
And you have to add the way you track your offer by using the subid2 (Cake doesn’t allow using subid1 for tracking) by adding:
&s2=<tid>
So the URL you add in the offer step during the wizard looks like this:
http://cldoffers.com/?a=66666&c=999999&s1=&s2=<tid>
Check the screenshot from above again just to see how I wrote that in the URL area and that’s how you need to do it.
Click next and you’ll have to create your campaign now:
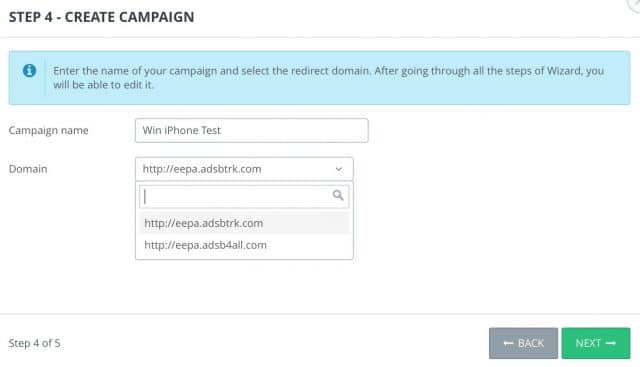
You can name your campaign whatever you like depending on how you want to organize them. I’m naming my campaigns “Win iPhone Test” just as an example. Also, you’ll need to select your tracking domain. if you already added a custom domain chose that one. Otherwise, just keep the default domain there and click next.
You’ll see the last step where you can grab your links and set up your postback.
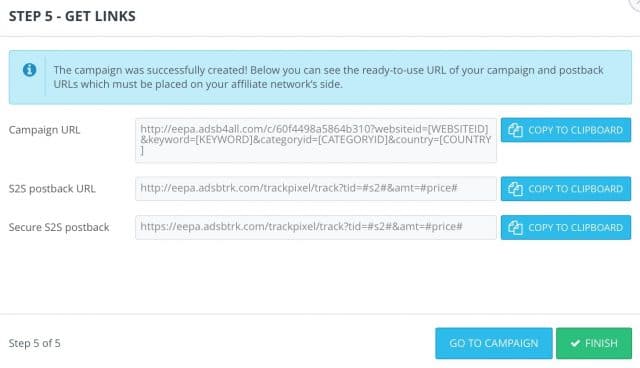
Congratulations, you’ve created your first campaign and if you grab that Campaign URL link and put it in your traffic source you can launch your campaign. But before that, let’s set up the postback. For that, you need to grab the S2S postback URL from the last screenshot and set it with your offer in the network.
If you remember we’re using Clickdealer, so I’ll just copy and paste that post back in the offer window in the “Testing & Tracking” tab. Look below to see exactly where I put the postback. After that click save in the offer window and now you’re ready to launch a campaign.
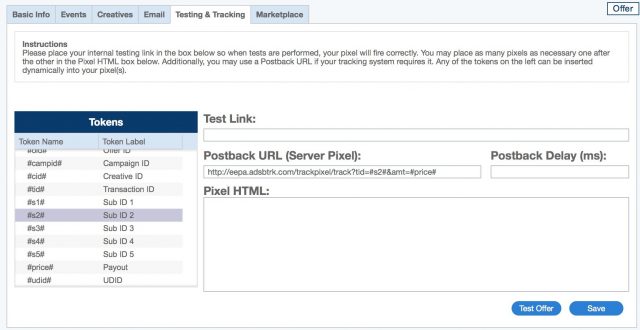
If you were to launch a direct linked campaign all you had to do would be slapping the Campaign URL link in your traffic source (PopAds in this case) and let it run. However, launching direct linked is almost suicide unless you know what you’re doing, so let’s customize our campaign first and also learn how to add landing pages and split test them.
Editing your campaign
From the main menu at the left side, go to your campaigns and select the campaign you’ve just created with the wizard and you’ll be able to edit the following information:
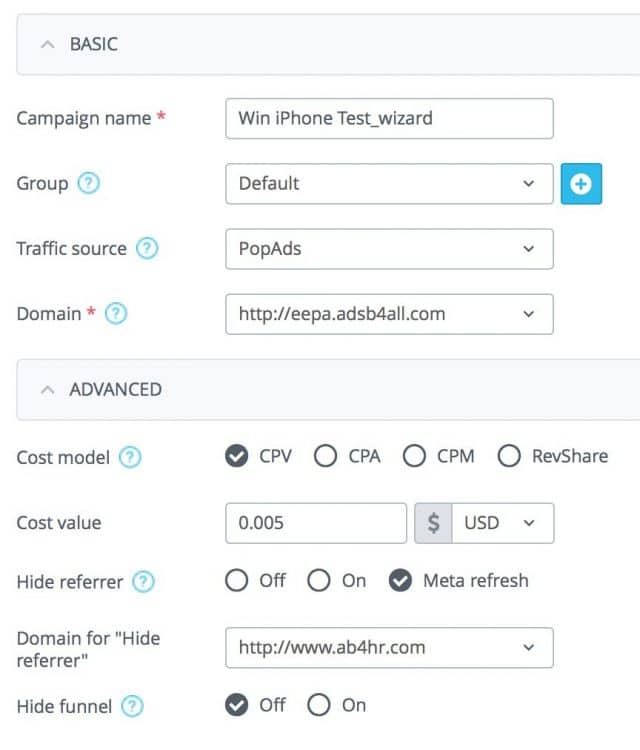
Here you can add the campaign to a group for organizational purposes (e.g. one group for sweepstakes, one group for Nutra, one for gambling, etc.) and also you’ll be able to select a Cost Model. While PopAds allows you to track the costs with dynamic tokens, many networks don’t have an option so just fill out the value you’re paying based on the campaign you’ll launch. For example, if you’re paying $5 per CPM you can either select CPM as the cost model and then write $5, or you can select the CPV (cost per view) and put $0.005 as I did, which also results in $5 per every thousand visits.
There might be some discrepancies in the costs of your traffic source and your tracker, but you’ll have to learn how to live with it as there’s no 100% accurate solution.
The “Hide referrer” option allows you to cloak your landing pages (self-hosted landing pages) and the Hide Funnel option can be enabled if you’re using Adsbridge to create landing pages. Yes, Adsbridge has a built-in landing page creator, but more on that later.
Click save and continue to the next page where you’ll be able to set up your paths and redirect rules. By default you’ll see a screen like this:
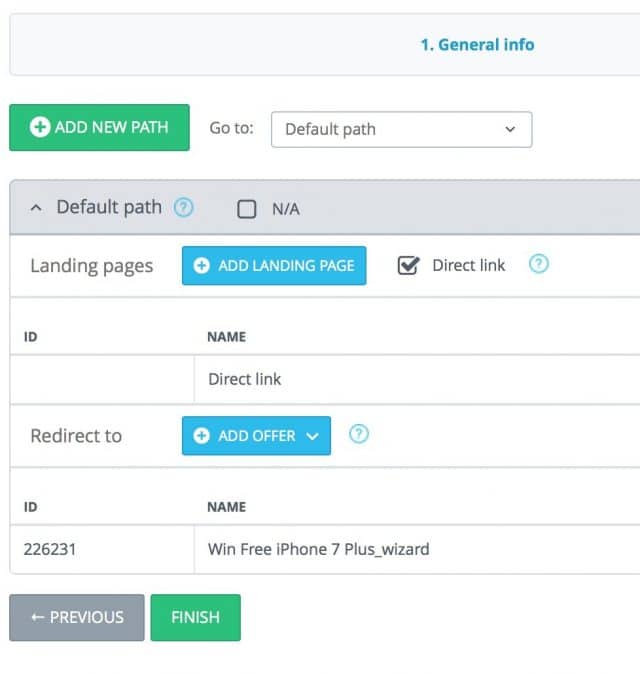
Right now the campaign has no landing pages, so it’s direct linked and it’s going to a Sweepstakes offer from Clickdealer. All of the traffic will go to that offer no matter what, but you want to add landing pages and split test them so it looks like this:
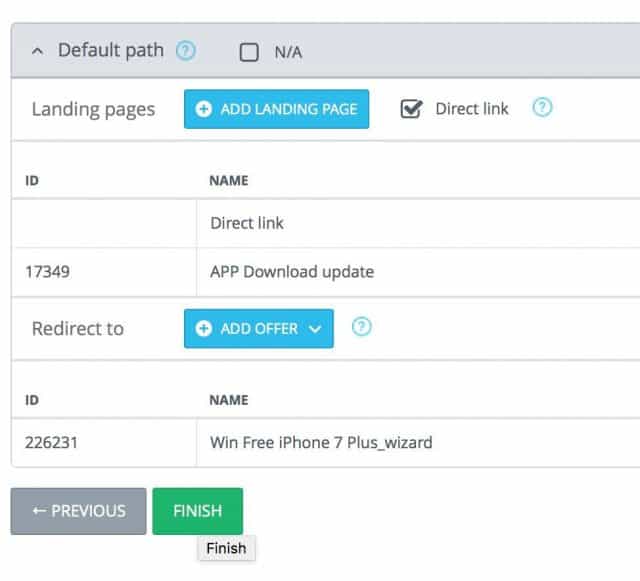
As you can see, I added a random landing page and now half of the traffic is going direct linked and the other half is going through an “APP Download update” landing page I added. After the visitors go through the landing page they will click the call to action button and go to the free iPhone offer from Clickdealer.
Add landing pages
Save your campaign and go to the landing pages menu on the left to create a new landing page. When you first open the landing page creator you’ll see 3 options:
- Start with a blank page
- Choose from a template
- Use a self-hosted landing page
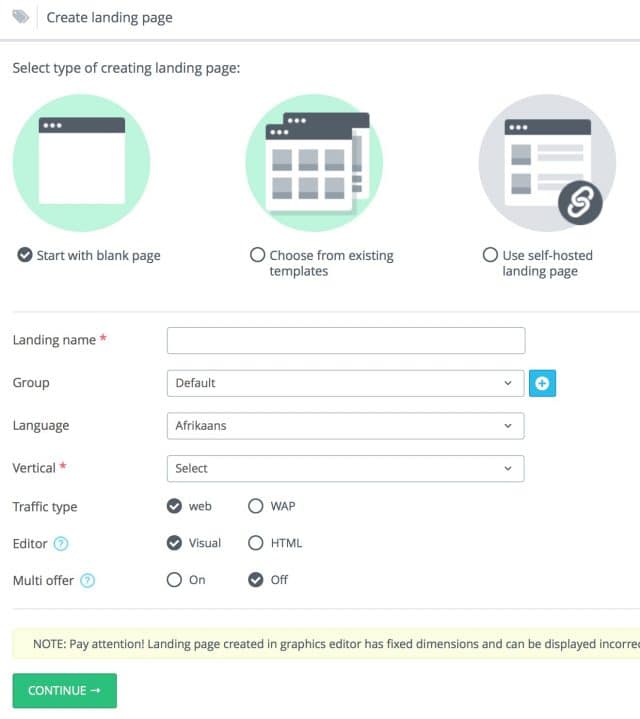
I always use self-hosted landing pages for various reasons, and to be honest I wouldn’t use the landing page builder at the point where I’m at. However, a lot of people struggle while trying to create and edit their landing pages, and some others struggle with the hosting setup, cPanel accounts, SSLs and a lot of things, in which case the Landing Page builder is a gift from Adsbridge for you.
In fact, if you buy your domain through Adsbridge and also host your landers with their builder you won’t need a server. Adsbridge would become your main tool to do everything in your affiliate journey at least for the first months.
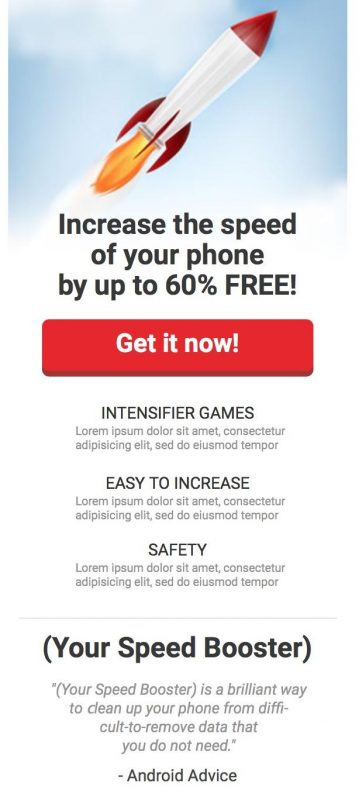
With the landing page builder I was able to take an existing template and tweak the text and image a bit to create this mobile landing page in just 2 minutes:
If you want to add a self-hosted landing page as I do, just select that option and write a name and the URL of your lander and you’re good to go. Additionally, you can group that lander with others, categorize it by language and vertical and even select if it’s a mobile or desktop-based lander for organizational purposes.
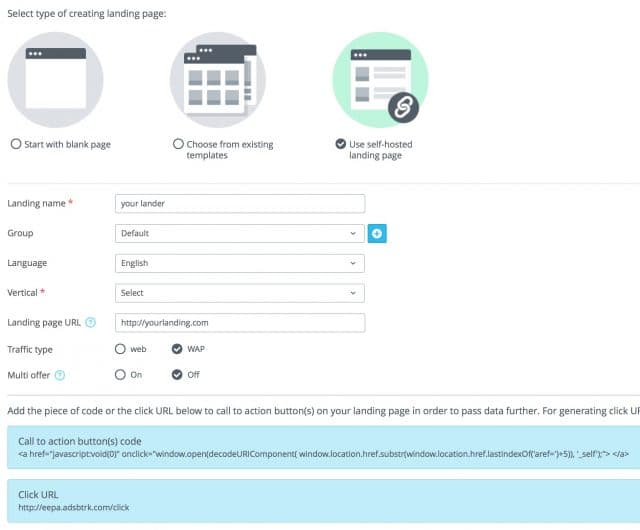
The only thing you need to do for Adsbridge to track your self hosted lander is to add the click URL to your Call to Action button on your landing page. In my case, the click URL was:
http://eepa.adsbtrk.com/click
But your click URL will change, especially if you have added a custom domain.
Save your landing page and go back to your campaign editor and now you’ll be able to add your landing pages to the path. A window like this will appear and you can select one or multiple landing pages to split test at the same time.
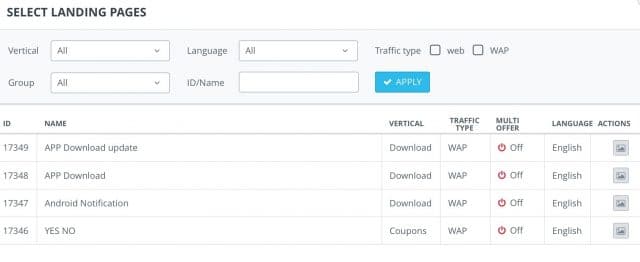
Once you have added your landing page to the campaign make sure you save everything and you’ll see the campaign URLs and postbacks again.
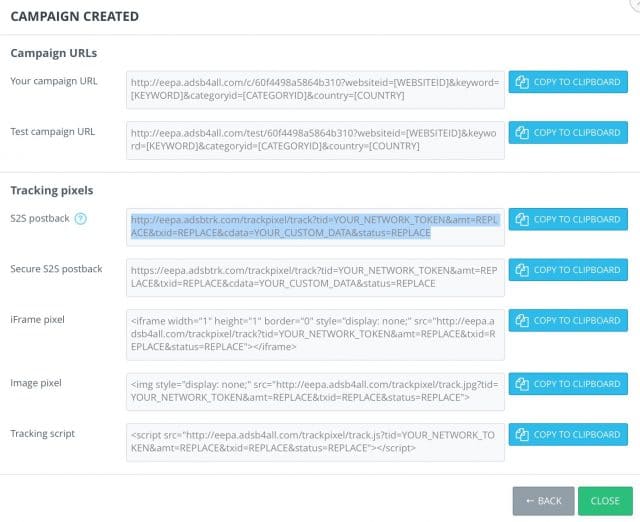
You’re ready to launch a campaign now. Just copy that Campaign URL link and paste it in the traffic source and let the traffic run.
Analyzing stats and optimization
I quickly spend $5 in PopAds just to see if the tracker is working correctly before doing anything else. This is something you want to do the first time to make sure everything is being tracked correctly. In my case I wanted to check the visits are being tracked, the tokens are working and check if the visits are going from the landing page to the offer and check the affiliate network to see if they’re receiving the clicks.
When you launch your first campaign your dashboard will now show a nice graph with the number of visits, clicks, conversions, and money spent/generated like this:
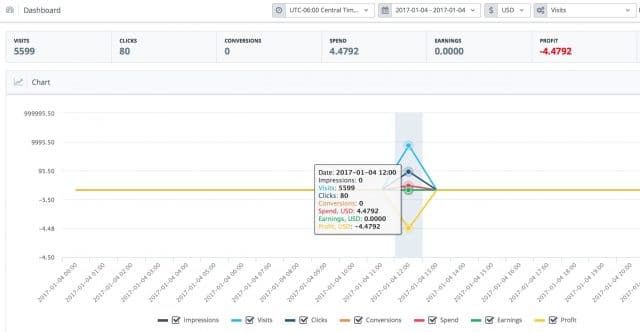
You will also see the data ordered by traffic source, countries and other variables that you can customize, and if we click our current campaign we will see the detailed report:
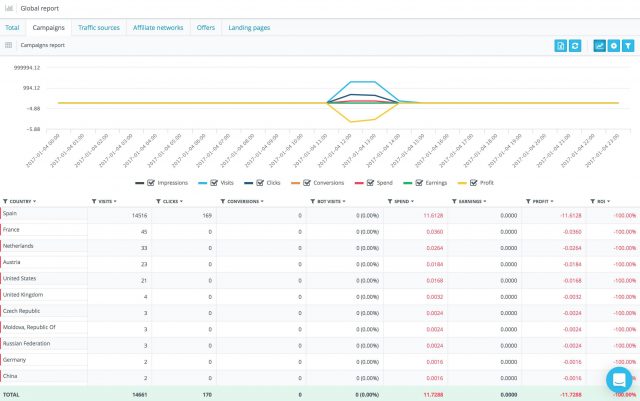
In the screenshot above you can see I made a small test and bought traffic from Spain. However, I received around 200 extra visits from other countries that I didn’t order and they probably won’t convert in my offer. Thanks to the tracker I can now forward that traffic to another offer or an offer rotator like YTZ, Mobidea, etc. so they can monetize it and show an appropriate offer for each geo.
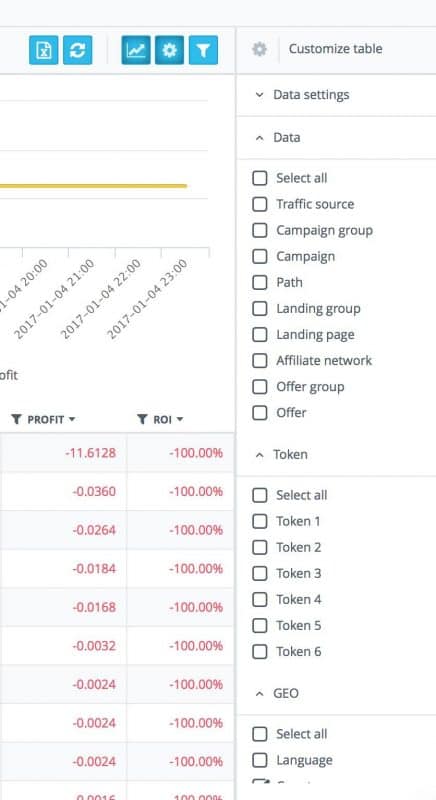
In the right upper corner, you can click the blue gear icon to customize your data and optimize your campaign according to different variables. By default, they’ll show the data based on offers, landing pages, and traffic sources but you can click the icon and select any data you want like in the screenshot below. I selected the token 1 from PopAds which shows me which websites are converting and getting clicks. I know that website number 1431063 received more than 1400 visits and so far it’s got 9 clicks to the offer but still 0 conversions. Total money spend is $1.1 so depending on my offer payout I might have to pause it or not.
Website 473172 has received 228 visits and so far 2 clicks to the offer with less than $0.2 spent, so I want to run more traffic before I decide to keep it or not.
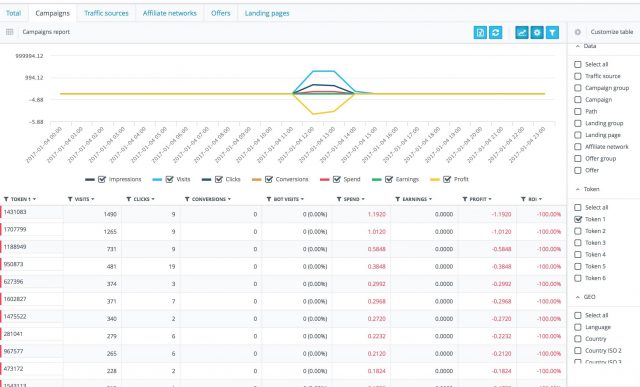
Adsbridge has a lot of variables they track automatically, like geo, OS, Browser, language, device, etc. And you can also track the dynamic tokens from your traffic source which will be listed in the Token area:
Now it’s up to you how you optimize your campaigns based on this data. For example, if you’re running mobile display traffic you’ll want to track which OSes, browsers and devices by brand and model (e.g. Samsung Galaxy S5) are converting to increase your bids there or simply block the rest.
If you’re running desktop display or native ads you won’t analyze devices, but instead analyze your banners, browsers, OS, and websites.
Adsbridge extra features worth mentioning
Most trackers stop here, but Adsbridge added a few extra features that others might have in their own way or maybe not yet. I just want to mention a couple because in 2013 we had nothing like this and you get access to them if you go with the $89 per month version.
Bot Filter
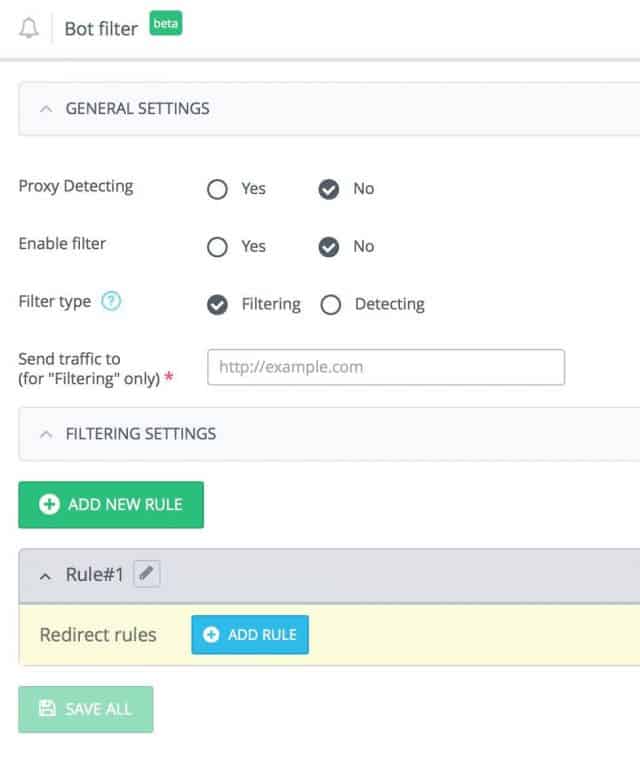
The first feature I want to mention is the bot filter. You can find it in the main menu and it allows you to detect bot traffic based on generic rules bit also on specific rules you set based on your data.
This feature is in BETA but so far I’ve been testing it and works as desired. Adsbridge can detect if the traffic is coming from a proxy (not necessarily a bot but very common) and you can filter those visits to a specific landing page. The real power behind this comes with the rules though, as you could block spy tools or competitors using automated systems based on your data.
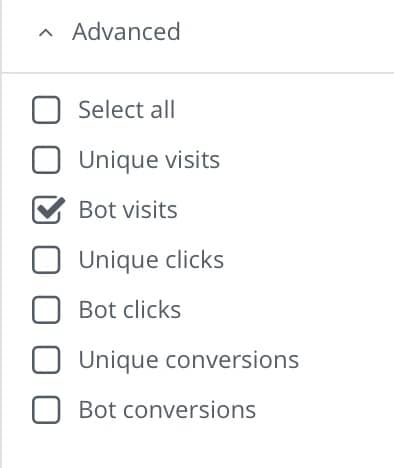
After you’ve added the bot filter and customized it to your own preferences you can see the data in your campaign reports by enabling the advanced settings. Here you can see how many visits, clicks (yeah, bots like clicking a lot or not clicking at all) and even conversions. This could be very useful in some cases, but that’s up to your imagination 🙂
Multiple users and roles
One of the most requested features for people working with teams and media buyers is user roles. This way you can have several people login into your Adsbridge account but you can set different rules to what they can do inside your panel.
For example, you might just want a media buyer to optimize your campaigns or a programmer to change the domain or landing pages URL only.
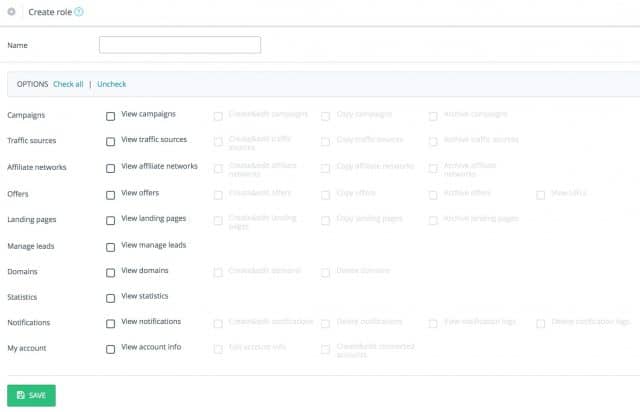
You can also select if you want them to only see your data, or allow them to clone, delete or create new campaigns, offers, landers, traffic sources, etc. If you have a partner you trust he can also modify the notifications and user roles. If you’re just getting started this might not be useful but if you work with a partner or have a team this feature is a must.
Adsbridge Notifications
One last thing I want to mention is the notifications menu. This is something I really like and wish other trackers had it.
So let’s say you’re running a campaign but the offer has a cap of 50 per day. Instead of letting your traffic run and try to guess when you have made 49 conversions to stop it you can setup a notification via email or SMS to get a message as soon as it reaches the desired number.
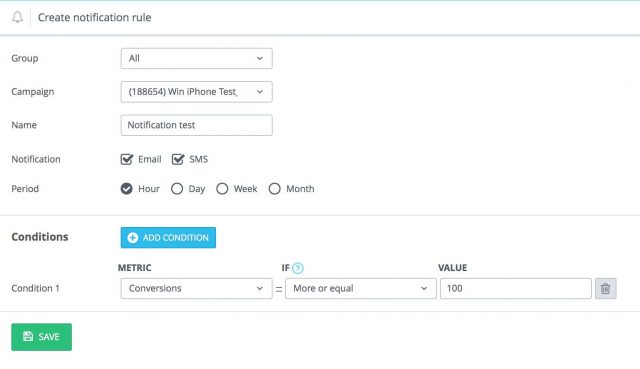
You can do other things, like set up notifications based on clicks and visits, and another nice feature is you can set up notifications based on EPV/EPC. So if you have a campaign running where you’re spending $1 CPM and making $1.5 CPM in revenue you can set up a notification for when the performance goes below $1 (meaning you’re now losing money). This way you could be alert for when something changes or the offer stops working or whatever happens and be on top of it ASAP.
Conclusions
Well, as you already know setting up a tracker the first time can be completely overwhelming and I know that. Thus I made this complete guide on how to set up and use every feature with Adsbridge and hope it helps you if you’re just getting started or if you want to move from another solution to Adsbridge.
Moving over from a tracker to another is probably even more difficult since you have to set up everything and learn it fast while your campaigns are already working, and you have to update all the links in the traffic sources, set up your filters, etc. But if any of the features from Adsbridge appeals you or the pricing scheme works better for your business, feel free to try it. You won’t be disappointed.
I’d like to repeat that nowadays we have a lot of solutions available and all of them have their pros and cons. I think you can’t go wrong with any of them, but some are just more useful than others depending on your skills and the traffic you’re running. The only one having a free trial and a basic plan for beginners is Adsbridge though, so if you’re new and you want to learn the ropes without spending a lot of money Adsbridge is a great choice.
Get your free trial here and if you have any questions let me know in the comments below.
FAQ
No, Adsbridge is Cloud Hosted and you don’t need to set up your own server.
You can either buy your domain with Adsbridge or register it and point it to Adsbridge on your preferred domain registrar.
Adsbridge starts at $29 per month and up to $379 per month according to your needs.
Yes, Adsbridge is the only tracker that includes a landing page builder
Yes, you can! We explain how to use this feature in the review.
P.S. If you want to learn how to track your affiliate campaigns with Voluum check out this great guide by my friend Erik Gyepes.
Hi. Servando!
Could you please include info that AdsBridge has 30% referral payouts?
I would be very thankful!
I tried to integrate adsbridge with adcombo and zeropark but it’s way complicated
Wish there was a video about this. Also I notice the campaign wizard on adsbridge is not active anymore or at least not for the trial account.
Have you tried contacting their support?
There are many trackers nowadays and integrating a traffic source or a postback is fairly simple in most of them.
Hey Servando!
Thanks for the AdsBridge guide.
I recently also wrote a guide/tutorial about tracking, instead of Adsbridge I wrote about Voluum.
Maybe we could interlink our content, so our reader can benefit from both posts: https://erikgyepes.com/voluum/ (it’s up-to-date 2017 version)
Hope you are doing well bro!
Erik
Hi Servando,
You mentioned that you use “self-hosted” landing page. Are there drawbacks for using landing pages hosted by Adsbridge, as compared for using our own? Is Adsbridge’s hosting fast enough for effective cpa marketing, or will I potentially lose out on traffic due to slow load times or down times? Let me know your thoughts, thanks!
It’s good for a test initially but eventually you’ll want to go self hosted for several reasons.
Their landers are fast enough anyways for testing campaigns.
Can you clarify the “several reasons” why it’s better to go self-hosted? Thanks!
You have control of your own landers, domain, SSL and you can update, delete it or modify it quick, etc.
Thank a lot for your guidance, I finally managed to set up my tracking system between clickdealer and adsbridge 🙂
I currently use popads as well, is Adsbridge able to automatically track tokens from popads ?
cheers
Good to know.
Yes, they have PopAds as a traffic source template ready to go.
I’ve tried using the traffic source template (popads) on Adsbridge, but I only see the report for following tokens from popads on my Adsbridge dashboard:
– Country
– Connection
How do I get full report of other tokens like WEBSITE ID, CATEGORY, etc?
Thanks man!
Check this image: https://servandosilva.com/wp-content/uploads/2017/01/Adsbridge-Review-Tutorial-campaign-stats-websiteid-768×465.jpg
There you can see there’s a column where you can select the subids you want to analyze. Select the subid1,subd2, etc. to analyze each token.
it works.
thanks 🙂
No problem mate 🙂
Great read, can I add you on Skype?
Mine is cass.super
Would love to get in touch
My AM is asking me to divide my traffic (Unique clicks via s2 / Non-unique via s1) and i don’t know how to do it on Adsbridge !! please help
I haven’t heard that before, honestly. What’s the reason behind it? Are they detecting duplicated leads or something similar?
She toldme that :
” this will lower the risks for you if adevrtiser decides some leads are bad
only the s1 which delivered those leads will be paused
all the rest sources will be allowed to carry on
otherwise if advertiser doesn’t like any of the leads your all account will be asked to pause ” !!!
Let me ask the Adsbridge team if you can do this.
I’ll be back to you with an answer next week.
This would be very helpful, thank you
No problem!
I don’t get it how to track CTA click, How to send that info to adsBridge..
I can’t make to deal with they support, like I am talking to wall lol
Hello Goran. Did you setup a domain or are you using the domains provided by Adsbridge?
You need to use the link at the bottom from this image: https://servandosilva.com/wp-content/uploads/2017/01/Adsbridge-Review-Tutorial-add-self-hosted-landing-page-768×636.jpg
That’s the click URL.
And put it in your CTA button.
Hi, actually I did managed, thx.
I had a specific situation.. I didn’t used affiliate network for offer so there were some hack until I successfully picked to fire conversion 🙂
Thx
Good to know it works now 🙂
Gran Articulo Servando
De todos los Trackers que as mencionado en el articulo, cual recomendarias mas para Afiliacion (Clickbank, Jvzoo, etc) y cual para CPA?
Sin tener en cuenta cosas como el Precio y que no necesites servidor
Adsbridge funciona bastante bien para Clickbank. Aquí hay un artículo de como configurar ese tipo de ofertas: http://news.adsbridge.com/conversions-tracking-between-adsbridge-and-clickbank/
FunnelFlux también es una buena opción para ventas de afiliados. Para CPA Adsbridge y Voluum son mis favoritos.
Gracias por tu respuesta Servando. Seguire tu consejo y probare Adsbridge en los proximos dias.
Ademas de Trackers usas alguna otra herramienta de analisis o Split testing para Afiliados y CPA?
Herramientas como Clicky, Luckyorange, Heatmaps, Visual Website Optimizer…… O solo usas un Tracker
El Split testing lo puedes hacer con el mismo tracker sin necesidad de ese tipo de herramientas. Los heatmaps te pueden ayudar a complementar pero finalmente los resultados los vas a ver al momento de hacer split test y ver cuales variables en las landing pages te funcionan mejor.
Ok
Gracias Servando
The best guide about adsBridge so far..well done!
Do they have options to track some custom events?
Like when user clicks on some non-CTA element etc
Thanks.
I don’t think they have something like the example you mentioned. While you can track separated events with many trackers (e.g. upsells) tracking clicks in the landing page or other stuff seems to be more related to heatmap tools.
Yea, thx.
If one have for example sweepstake presell with few quiz questions or so..
I think it could be useful to record clicks.
And than in adsBridge report we could see percentage of how many of them started quiz, canceled, canceled on second question or so.
Is there a need to monitor that sort of stuff?
Thx
That would be super useful because you could know what happens without coding it. For sure something they could add in the future if they want to have an edge over the competition.
They’ll require to use a javascript code or pixel to make it work, which is how other companies do so. The main advantage would be using it without paying an extra for another tool.
I believe FunnelFlux is the only tracker that can do this, it allows to track all the clicks/events happening in your unlimited-depth funnels, and it works with quizzes like the one you mentioned. disclaimer – I’m the creator of this tracker.
Agree. I can vouch for Funnelflux for this specific feature which nobody else has.
BTW, VitaVee, feel free to comment in my blog whenever you want.
Thanks Servando, I will